For Flashing Guide&Videos Must Subscribe Our Channel

Monday 16 January 2017

All About Asus Sideload Flashing Guide

All About Asus Sideload Flashing Guide

All about ADB Sideload. Today we will do ADB Sideload to Asus ZenFone 2 Laser Ze500KL. This tutorial will be quite complicated and tricky so don't ignore any points otherwise you will be in trouble.


There are various step that we need to follow before proceeding to Sideload. The Steps we need to do before installation is written below.


1. OS specification.

2. Installing Proper ADB and Fastboot Drivers.

3. Preparing mobile


So let's start with these Points.


OS specification:Operating System requirements are the most important. We need a correect operating system to install drivers and Do ADB sideload.

You can use From Windows XP to Windows 8.1. You can't use windows 10 because this OS is totally new and no drivers have released yet from Asus to Install on it.


Installing Proper ADB and Fastboot Drivers:Well, we need ADB and Fastboot driver. I have something special for you guys.


Download link for ADB and Fastboot Files is in the link = http://www.rootjunkysdl.com/files/Ad...%20WINDOWS.zip

Now we need Driver for Asus Zenfone 2 Laser ZE550KL. = http://dlcdnet.asus.com/pub/ASUS/Zen...s_20150316.zip

Now for Installation of the driver follow the steps below.


1. Extract the Downloaded file in desktop

2. Go to extracted folder and (Windows_XP_VISTA_7_8_8.1 -> Android)

3. Right, click on the file (android_winusb.inf) and press on install.


Yes, now you have installed the USB drivers for ZenFone Laser.


Preparing mobile:Now we need to set mobile. Follow the steps below.


1. Switch off Mobile

2. Press And hold Power Button + Vol Down button Same time and leave the button as soon as you see Asus logo in display of the phone.


Now You are on recovery mode. Use Volume buttons to move up and down and power button for select.


Now press volume down button and select " Apply Update from ADB"

مركز تحميل الصور
Now we have done all the setup. It's time to Sideload.


Sideload Procedure:

You must have the firmware of your phone to sideload. Currently, i am downgrading my phone from Version 1.16.40.xx TO 1.15.40.xx
After Downloading the proper firmware place it on the desktop, we need to flash the phone
Now connect the phone to computer.


Hold Shift and Right click on any blank area on desktop then choose "" Open Command window here"
مركز تحميل الصور
Then a command window will pop up. Now we need to check whether our phone properly connected to PC and ready to flash or not.


so type the following command in the command window. = "adb devices". After that, you can your phone serial number connected to it. If you can see the serial number then yo are ready to go.
مركز تحميل الصور
Now type this command = adb sideload filename.zip (EG: adb sideload UL-Z00L-WW-1.15.40.639-user.zip)


NOTE: The firmware file you have downloaded must be placed on the desktop.


Then you will see a loading file .. Wait for few minutes and then it will start serving.


Wait guys its take some time. After 50% complete in Command window just look at your phone and you will see come changes like this.
مركز تحميل الصور
Now wait for some time and then your phone will say that " Installation from ADB sideload completed"

مركز تحميل الصور
Now choose reboot the device and your phone will get rebooted.

After this when your phone get on you will see a screen like this

مركز تحميل الصور
Wait for it to complete. Then your phone is ready to use... Happy


It's a complicated process so first read properly and then proceed to next step.
How to Fix Redmi 2 2014818 Unknown Basebond and imei Null Problm Tutorials

How to Fix Redmi 2 2014818 Unknown Basebond and imei Null Problm Tutorials

WARNING NOTE : THIS FIX APPLIES TO REDMI 2 and REDMI 2 PRIME ONLY


Lets get Started!!

Pre-Requisites / What you need in your computer.


Now lets get started..

Enabling Diag mode on your device

  • Run "Minimal ADB and Fastboot" and execute the following commands
    adb shell
    su
    setprop sys.usb.config diag,adb


    This will disconnect your device and reconnect the device
  • Now use the following commands to confirm that the above commands were successful
    1. adb shell
    2. su
    3. getprop sys.usb.config


    important Copy the Code
  • Also you will see an additional device in the device manager
    Before:

    After:
  • Download and Extract the following file to a known Location in your computer
    RM2_RM2PRIME_QCN.zip (41.19 KB, Downloads: 6471)
  • Now open this file using UltraEdit and you should see a screen like this

  • IMPORTANT:What we are going to do next is that we are going to Edit this file to Put the desired IMEI Number in the File
    I have edited this File to contain the Numbers, that we search for in Points 5 and 6, in the place of IMEI.
    Our work is to replace those numbers with the IMEI of your own device.
  • Now Run the "IMEI Converter.exe" and Convert the IMEI that you had written from the back of the device to Hex
  • (The IMEI shown in the above pic is just for Illustration Purposes)
  • Now Find the following sequence of hex numbers for SIM1
    08 8A 76 15 02 82 19 52 55

    and Replace it with the IMEI generated from the IMEI Converter.exe for the IMEI for Sim1
    NOTE: MAKE SURE THE PROPER SEQUNCE AND SPACING IS MAINTAINED

    To replace the Numbers Just Click on the Number and Type the new Number
  • Now Find the following sequence of hex numbers for SIM 2
    08 8A 76 15 02 82 19 52 51


    And replace it with the IMEI generated by the IMEI Converter for the IMEI for Sim2
  • Now save the file and Exit UltraEdit
  • Now again Run the Minimal ADB and Fastboot and execute the following commands in the sequence
    1. adb shell
    2. su
    3. dd if=/dev/block/mmcblk0p13 of=/sdcard/modemst1
    4. dd if=/dev/block/mmcblk0p14 of=/sdcard/modemst2
    5. dd if=/dev/block/mmcblk0p20 of=/sdcard/fsg


    Copy the Code

    1. dd if=/dev/zero of=/dev/block/mmcblk0p13
    2. dd if=/dev/zero of=/dev/block/mmcblk0p14
    3. dd if=/dev/zero of=/dev/block/mmcblk0p20
    4. reboot


    Copy the Code
    The first set of commands will create a backup of the existing images and the next will wipe off the modemst1 modemst2 and fsg partitions
  • Once you restart you will find IMEI to be gone and 0
  • Once you restart you will lose the diag mode. you willhave to follow 1 to 3 to enable it
  • Now Run the QPST and Select the Ports Tab

  • You should see the port added automatically
    In case you dont see any port you can use the "Add New Port" button
  • Now Click on the Start Clients option on the Top Menu bar

    and select Software Download
  • You will see a Window like this
  • Click on the restore tab and then browse to the file that you just saved.
  • Now click the start Button
  • Once it is done Reboot your system and You should have your IMEI restored

Tuesday 13 December 2016

YU5010 Mega Thread  Dead Boot Repair, Official Stock Firmware & Root

YU5010 Mega Thread Dead Boot Repair, Official Stock Firmware & Root


Official Stock Signed Firmware:


Flash Tool Batch File 


Soft unbrick Guide:


Download cm-12.0-YNG1TBS1O3-lettuce-signed-fastboot.zip 

Extract it to yur desktop

Extract and copy flasht tool batch files into firmware folder

Connect yur device in fastboot mode (hold vol dwn and connt usb for fastboot mode)

Run flash all bat file.


Dead Boot Repair Guide By gsmdevelopers Team


* Download Full Dump from here Full Dead Boot Dump (1.31GB) After extract it vil be more than 14GB. 

* Need more than 16gb sdcard (Format it)

* Run Windisk Imager Download here

* Write the img file on sdcard using Windisk Imager (it vil take more than 30min to complete)

* After complete insert sdcard to yur phone then insert battery.

* Hold vol dwn or vol up and conntct usb, You will see lik below givn in the picture


* After that if yur device not detected by pc jus hold pwr key until yur screen goes black then suddenly
release power key nd hold vol up key.

* You vill see recovery mode there select reboot into bootloader mode, No yur device should be in fastboot.

* Follow Soft unbrick Guide to revive your phone again. ;)

Saturday 10 December 2016

Samsung FRP Helper By CrackingGSM Team (Bug Fixed)

Hello Friends,
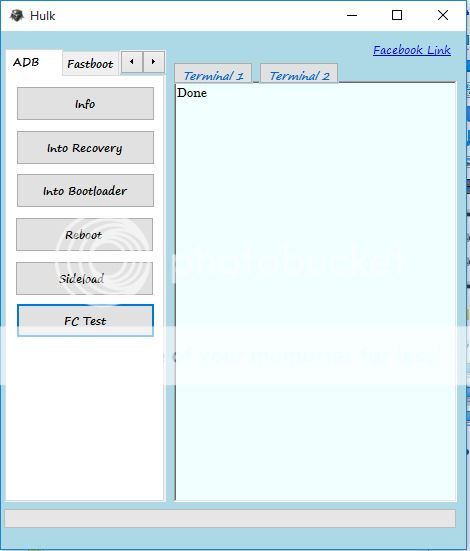
I am releasing the first version of Samsung FRP Helper tool. It is a simple tool to make a call over serial port. Everyone know the method of removing FRP through "REAL TERM Method" It will make easy to do that.

Advantage :

  1. No need to check device manager for COMPORT
  2. Easy to use User Friendly UI
  3. One click calling function.
  4. Small size
Hope it will help some people to remove FRP of Samsung handsets. If you find any bug in this please let me know. I will fix it. Thanks for your attention.

PS : If you don't know "RealTerm Method". Please use Google.

Thanks for visiting our blog. I Hope you will find great thing here.

Update 1 : Bug Fixed no modem port showing
Update 2 : Bug Fixed showing no ports
Update 3 : Changes in GUI. (Used Alpha Skin)
 

Sunday 4 December 2016

Friday 18 November 2016

Saturday 12 November 2016

 LENOVO K3 Note (K50-A40) FRP remove, Without any BOX

LENOVO K3 Note (K50-A40) FRP remove, Without any BOX

LENOVO K3 Note (K50-A40) FRP remove, Without any BOX

LENOVO K3 Note (K50-A40) FRP remove, Without any BOX


For K3 Note (K50-A40) FRP remove,


Follow this steps:
1. Download this Scatter file,


2. Download this specific version of SPFT,


3. Load the Scatter file into SPFT,
4. Go to "Format" tab,
5. Check "Manual Format Flash",
6. Use this values,

  • Begin Address[HEX]: 0x7fa0000
  • Format Length[HEX]: 0x860000


7. Press "Start",


>>DONE


Thursday 3 November 2016

Thursday 27 October 2016